
In this article, you’ll learn:
If you’ve been running your Shopify store for a while, your image library is probably full of old banners, outdated product shots, and test uploads. At some point you try to clean it up… and suddenly you’re afraid to touch anything because you don’t want to break live product pages.
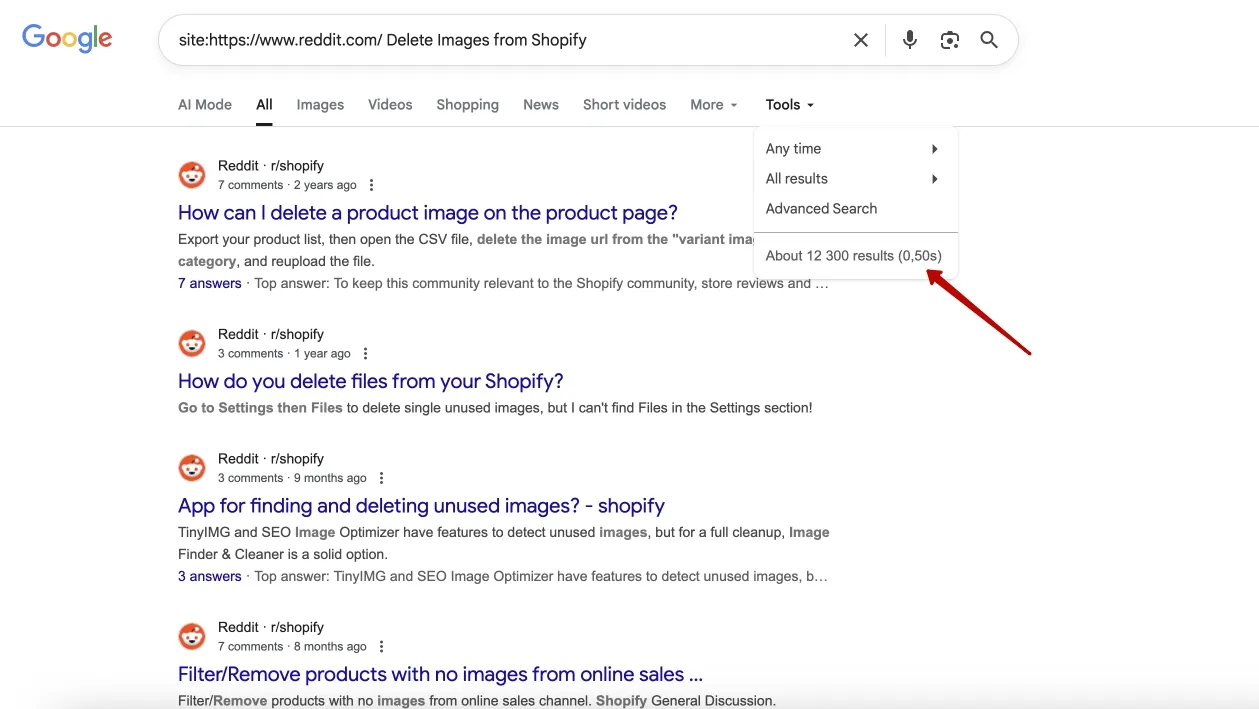
A quick scroll through Shopify threads on Reddit shows the same pattern: merchants aren’t sure where images actually live in Shopify or what breaks when they delete files from the library.
This guide walks through several ways to start deleting unnecessary images from your Shopify library safely, so you can clean things up without breaking live product pages.
Quick overview: how to delete images from Shopify library safely
Short version:
- Shopify stores images in two places: Files (Content > Files) and product media (Products > [Product] > Media).
- Deleting from Content > Files removes the file everywhere it’s used.
- Removing a product image only unlinks it from that product; the file usually stays in Files.
- For small cleanups, delete manually from Files and product pages.
- For large cleanups, use CSV, apps, or the Admin API — and always double-check which images are still in use before you remove anything.
Now let’s go through each part in detail.
Where Shopify Stores Your Images (And Why It Matters)
Most accidental damage happens because people don’t realize how Shopify stores media. Before you delete anything, it’s worth understanding the basics.
Files vs. Product Images
In Shopify, images end up in two main buckets.
Files (Media Library)
This is the general storage area for your account. Go to Content > Files in the admin, and you’ll see everything you’ve ever uploaded: product photos, blog images, banners, PDFs, logos, and other media.
These files don’t “belong” to any one product by default. The same file can be used:
- on a product page
- inside a blog post
- in a theme section or custom block
- or not be used anywhere at all
Product Images
These are the images attached directly to a specific product.
When you open Products > [Product Name] > Media, you’re looking at the images linked to that SKU. Those files can still appear in the Content > Files list, but their primary relationship is with that product.
Shopify’s own documentation describes this split between product media and the Files section, and confirms that you manage all uploaded files from Content > Files in the admin.
Why this matters
- If you delete an image from Content > Files, you’re deleting the file itself. Anything that relies on that URL — product pages, collections, blog posts, theme sections, custom content blocks — immediately loses access to it.
- If you remove an image only from a product page, you’re just breaking the link between that product and the file. The image still sits in Content > Files until you delete it there as well.
Understanding this difference is the key to cleaning up without breaking your storefront.
Shopify’s storage limits
On lower-tier Shopify plans, file storage isn’t unlimited. Old and unused images still count toward your overall quota. As you get close to that limit, you may:
- hit errors when uploading new files, or
- end up paying for extra storage sooner than you expected
There’s no built-in “clean up unused images” button, so you have to decide which unnecessary images are safe to remove without affecting live products or pages. Regular housekeeping in your library keeps storage under control, but it has to be done carefully so you don’t delete files that are still live on your site.
You can review and manage all stored files from Content > Files in your admin, which Shopify recommends as the central place to upload and delete media for your store.
How to Delete Images from Shopify Library Manually
If you only need to clear out a small batch of images, manual deletion is usually enough.
Deleting images from the files section
To remove files directly from the media library:
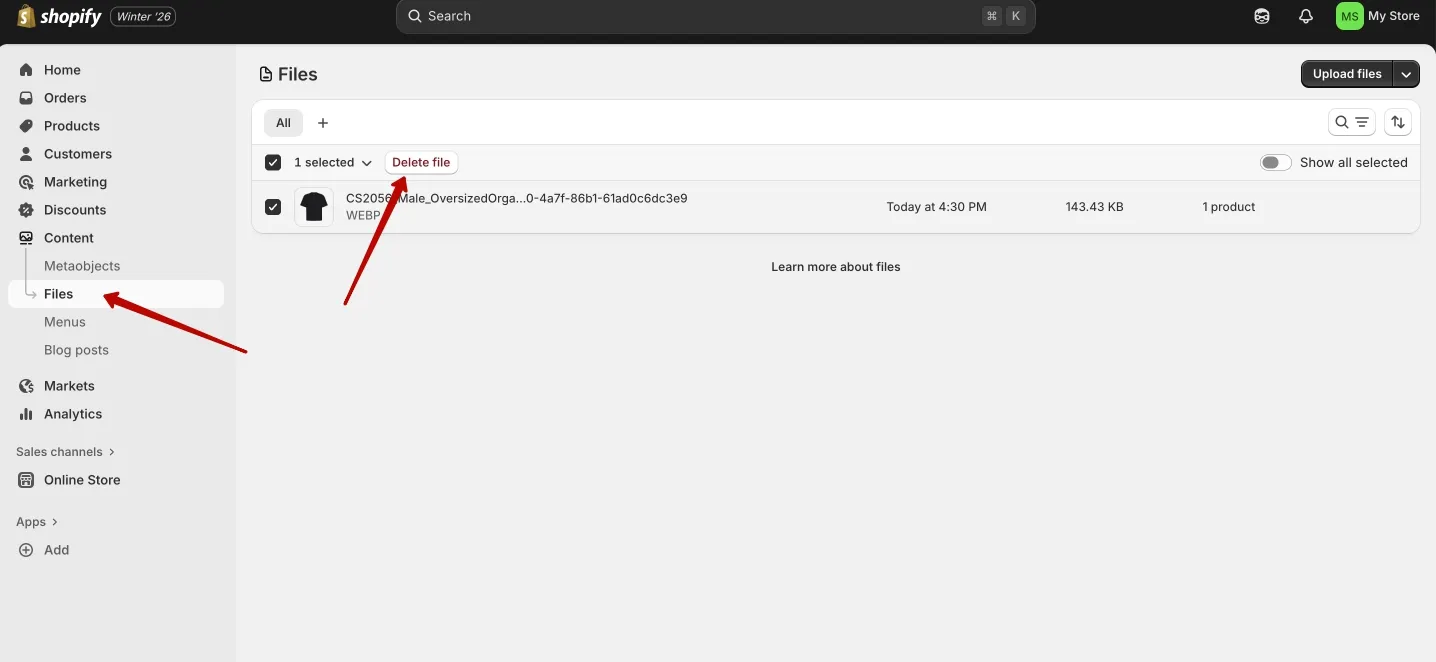
- Go to Content > Files in your Shopify admin.
- Use the list or search box to find the images you want to remove.
- Tick the checkbox next to each file you plan to delete — you can select multiple images at once instead of removing them one by one.
- Click the Delete files button at the top of the page.
- Confirm the action in the popup window.
Things to keep in mind before you confirm:
- Shopify doesn’t have a recycle bin for files. Once a file is deleted, the only way back is to re-upload it from your own copy.
- If that file was still used on a product page, in a collection, a blog post, or anywhere in your theme, visitors will see a broken image or an empty space instead.
- After a big cleanup, it’s worth opening a few key pages in your live store to make sure nothing important disappeared.
Removing product images one by one
To take an image off a single product:
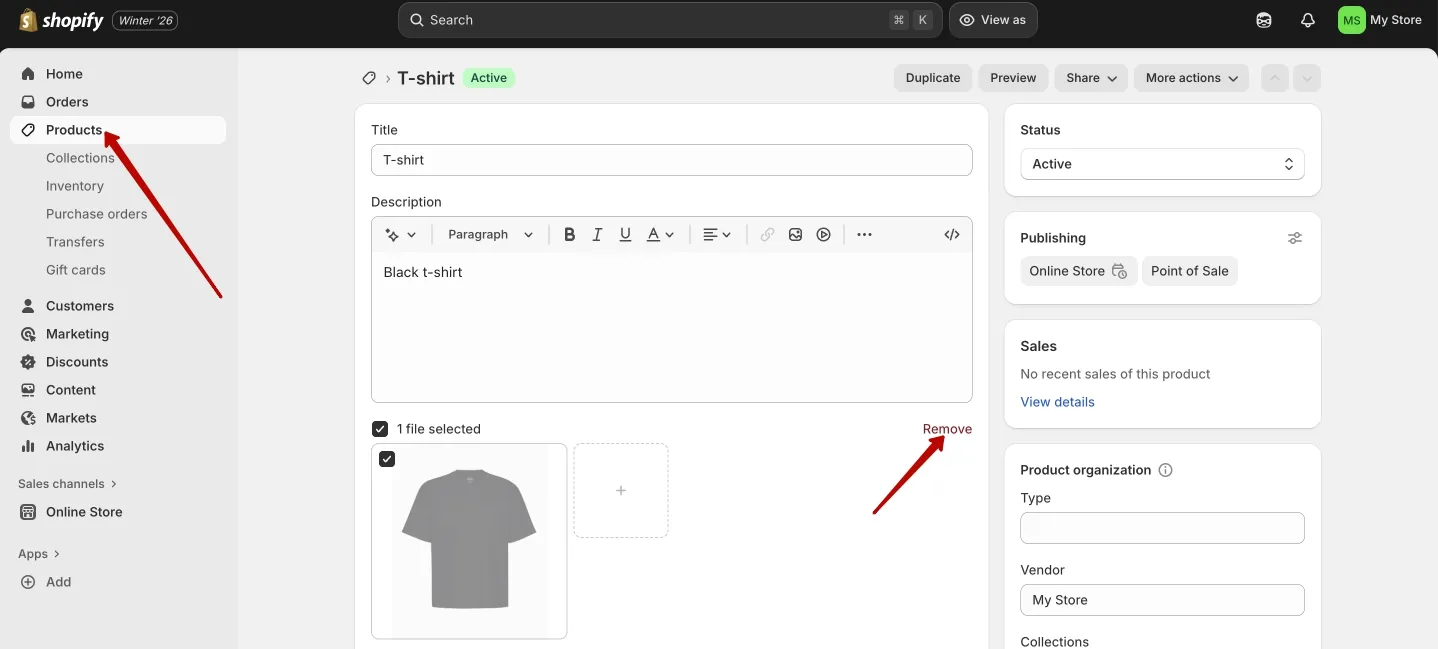
- Go to Products in your Shopify admin.
- Open the product you want to update and scroll down to the Media section.
- Hover over the image you want to remove and click the Remove button.
This removes the image from that specific product page, but the original file usually remains in Content > Files. If you want it gone from the store entirely, you still need to delete it from the Files section.
Sometimes, because of caching, an image may appear to stick around for a short time after you delete it. That’s normal; the storefront usually catches up shortly afterward, but it’s something to be aware of when you’re checking changes.
How to Bulk Delete Images in Shopify (For When You’ve Got a Lot to Clean Up)
When you’ve accumulated a lot of unused images, clicking through everything manually stops being realistic. That’s when bulk methods become much more practical.
1. Bulk delete via CSV file
Shopify lets you update products through a CSV file. If you clear the Image Src column for a product, Shopify removes the images currently attached to that product.
Steps:
- Export your product list (Products > Export) and download the CSV.
- Open the file in Excel or Google Sheets.
- Find the Image Src column and clear the cells for products whose images you want to remove.
- Import the edited file back into Shopify via Products > Import.
A few caveats:
- This only affects images on product pages. It doesn’t touch the original files in Content > Files, so your storage usage stays the same.
- It’s useful when you want to strip images from products and maybe rebuild visuals from scratch, but you’re not ready to remove the files from your account entirely.
2. Delete images via Shopify API
If you or someone on your team is comfortable with code, you can also use the Shopify Admin API to remove images in bulk.
The general idea is:
- Authenticate against the Admin API for your store.
- Use the Files or Product image endpoints to list the images.
- Filter that list by whatever rules make sense for you (for example, upload date, filename pattern, or whether the image is linked to a product).
- Send DELETE requests for the images you’ve decided to remove, keeping an eye on Shopify’s rate limits.
This approach is fast and flexible, but it’s also unforgiving: a mistake in the script can take out a lot of images at once. Always test on a development store first and keep good backups before you run anything on your live store.
3. Use Shopify Apps
If you’d rather avoid writing code (or you just want a faster way to clean up your images), Shopify apps are worth a look. There are apps that can:
- scan your store and highlight unused images — files not linked to any active products or pages
- bulk delete images in a few clicks
- compress and resize images to help pages load faster
- automatically add alt text to images to support SEO
Some focus only on product images, while others also handle files in the general media library. Because most of them come with monthly fees, it’s worth checking whether you’ll actually use the features regularly.
One quick tip: before installing any app, check reviews and see what permissions it asks for, especially if it can delete files. You don’t want an over-aggressive cleanup to wipe out images you still need.
If you’re wondering how to remove images from Shopify library without getting stuck in endless clicking, apps are often the most user-friendly way to do it — especially if you’re running a larger store and manual cleanup just isn’t realistic.
The Smarter Way: Use a PIM System for Image Cleanup and Syncing
Manually sorting through files is fine if you’re running a small store with a handful of products. But if your catalog is larger or you’re selling on multiple channels, deleting and updating images by hand gets old fast.

That’s exactly why many teams move to a PIM system — short for Product Information Management. If you’ve never used one, think of it as your product data’s home base. Your descriptions, prices, specs, and images all live in one place. From there, the PIM pushes everything out to Shopify, Amazon, Etsy, or anywhere else you sell.
Here’s what makes PIM so useful for images:
All your images in one place
Instead of jumping between different stores and folders, every product image lives in your PIM — organized and easy to find. You don’t have to guess whether you uploaded the latest image to Shopify but forgot about Amazon; the PIM is the source of truth.
Bulk updates without the chaos
Replacing a set of images across dozens or hundreds of products in Shopify manually is tedious. With a PIM, you update the image once, and it updates everywhere it’s used — across channels and stores.
Say goodbye to duplicate or missing images
PIM acts like a guardrail. Every product gets the images it’s supposed to have — no more, no less. If you’ve ever found a product page with a leftover image from a discontinued item, you know how valuable this is.
Automatic syncing — no more manual uploads
When you update a product image in the PIM, that change flows into Shopify (and any other connected sales channels). You don’t have to upload files manually, adjust CSVs, or copy URLs between systems.
Version control and safety
Many PIM systems keep previous versions of images and show where each file is used. That means you can see which assets are safe to remove and roll back if you ever delete or replace something too aggressively.
A PIM makes the whole process of how to delete images from Shopify library much safer. Instead of clicking through files and hoping you don’t accidentally trash something important, you can remove outdated images in bulk with full visibility into where they were used.
Best Practices for Managing Shopify Images (So You Don’t End Up in This Mess Again)
After helping a friend clean up her Shopify library once, we both agreed we didn’t want to repeat that experience. These simple habits make the next cleanup much easier — and less frequent.
Set regular cleanup days
Every few months, block out time to clear out unused images. If a file hasn’t been used in a long time and it isn’t tied to an active product, collection, or campaign, it’s usually safe to remove — especially if you have a backup stored elsewhere.
Automate the boring stuff
Whenever possible, let apps or a PIM system handle repetitive work: bulk updates, automatic image replacements, detecting unused files. All of this is technically possible to do by hand, but tools do it faster and with fewer mistakes. The more products and channels you manage, the more important automation becomes.
Think before you upload
Before uploading any image to Shopify, take a moment to:
- Compress the file so it doesn’t slow down your store.
- Save it in a modern, efficient format (like WebP) if possible — Shopify supports it, and it’s better for performance than heavy JPEGs and PNGs.
- Give it a clear, descriptive filename.
A good file name is like leaving a note for your future self. “red-wool-scarf-front.jpg” makes sense whenever you open the folder. “Screenshot-2023-09-04-11-32-18.png”? Not so much.
Use a PIM if you work across multiple stores or channels
If you’re selling the same products in more than one Shopify store or on marketplaces like Amazon or Etsy, managing images gets much more complicated. A PIM lets you upload images once, link them to the right products, and sync them everywhere. Images stay consistent across channels without you jumping between tabs trying to keep everything aligned.
When you zoom out, how to delete images from Shopify library is only half the battle. The real win is building a system that stops clutter from piling up in the first place.
FAQ
Can I restore images after deleting them from Shopify?
Not from within Shopify. Once a file is deleted from Content > Files, it’s gone. The only way to bring it back is to re-upload it from your own backup or source files.
Does deleting images from Files improve page speed?
Cleaning up the library mainly helps with organization and storage. Page speed is affected by images that actually load on your pages. To make your store faster, focus on optimizing the size and format of images that appear on product pages, collections, and other key templates.
How can I safely find unused images?
There’s no built-in “show unused files” button. You can:
- export product data and check which Image Src URLs are in use
- use apps that scan your store and flag files not linked to active products or pages
- use a PIM to track which images are connected to which products and channels
Is it safer to delete from Products or from Files?
Removing an image from a product page is safer: you’re only affecting that product. Deleting from Content > Files removes the file everywhere it’s used. If you haven’t checked where the file appears, you can easily break several pages at once.
Conclusion: Clean Library, Happy Store
Whether you’re tidying up for cleaner product pages, fewer broken images, or simply a more manageable media library, keeping your Shopify images under control is worth the effort. Shopify’s built-in tools are fine for small jobs, but larger stores benefit from better processes and, often, from using a PIM system to keep everything in sync across channels.
Start with a quick audit of Content > Files, identify obvious candidates for deletion (old campaign assets, duplicates, images for discontinued products), back them up externally if needed, and remove them in small batches. Use CSV imports, apps, or API scripts when manual cleanup no longer scales. And if your catalog and channels are growing, consider a PIM system to centralize image management and reduce the risk of breaking your store as you clean.
If you want to see how a PIM could make image management (and a lot more) easier for your store, take a look at how Toriut helps Shopify sellers keep their product data — and their images — organized and consistent.
Author

Toriut PIM Product Manager Eugene focuses on catalog structure, metadata governance, and feed optimization. With a background in sales, logistics, and analytics, he turns real customer workflows into scalable product data processes that work across regions, SKUs, and channels.


